I'm really sorry to have to do this topeople, but the SPAM-BoTS have found my blog. I"m putting comments on word verification. If you leave a comment (Which I welcome and want) you'll have to verify that you are a person and enter in a word that will appear on the screen. I'm sorry to have to do this, but I've become very tired of deleteing 90% of the comments onhere and than not being able to find half the spam comments.
Hopefully you won't be detered byt this, and you'll also be happy that when you click on a comment link that it will be content rather than either a "This comment hasbeen deleted by the administrator" or some spam.
Saturday, October 22, 2005
Tuesday, October 18, 2005
Reporters
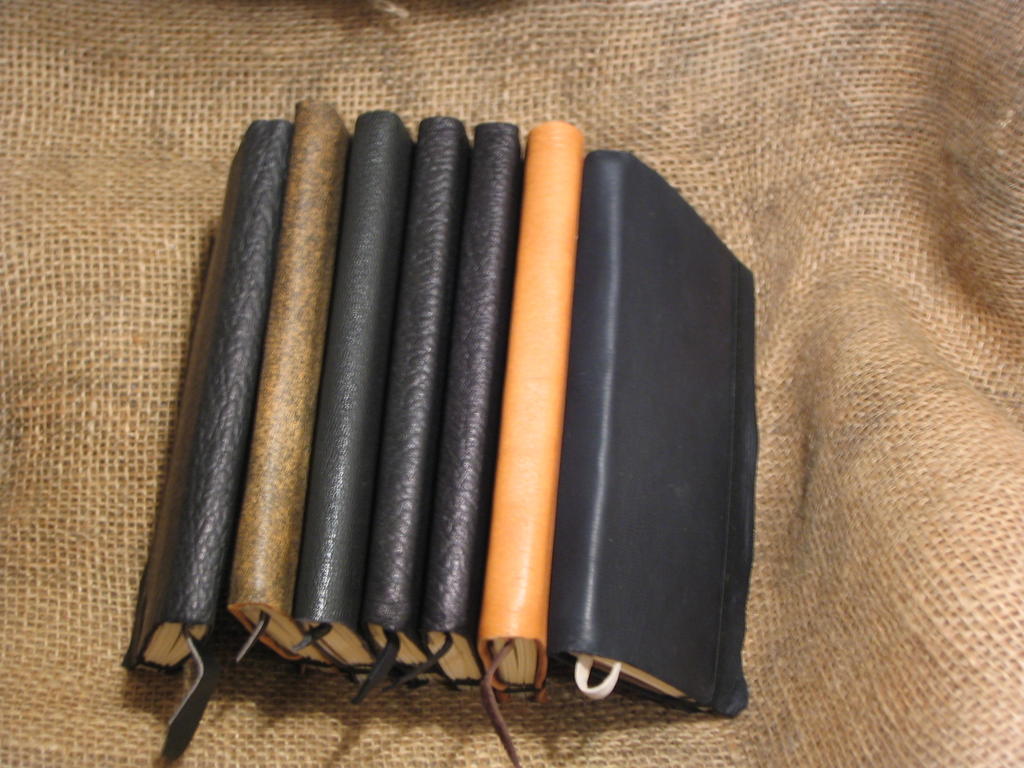
I had a request for a reporter style hedgie. So i made it. these are exactly like my other hedgies, sans bookmarker. These are lined per the request of the gentleman who requested them.

I also made 10 hedgies in 3 days. I sped the process up by using the pre-cut paper. It greatly increased my efficency. I found that I did make a few mistakes in regards to gluing, but those were easily remedied. The one mistake I made that could NOT be fixed was when I cut holes in a navy hedgie and also cut throught he book mark. That one will go up on ebay. Sigh. I was tired and should have stopped working about an hour before i cut those holes.
Here's the family shot:
Monday, October 17, 2005
Hedgehog/Moleskine Hack
This is a pretty simple hack but I thoguht I'd post about it anyhow.
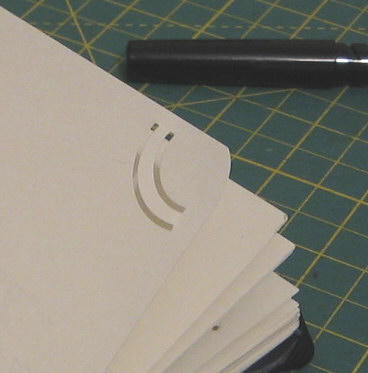
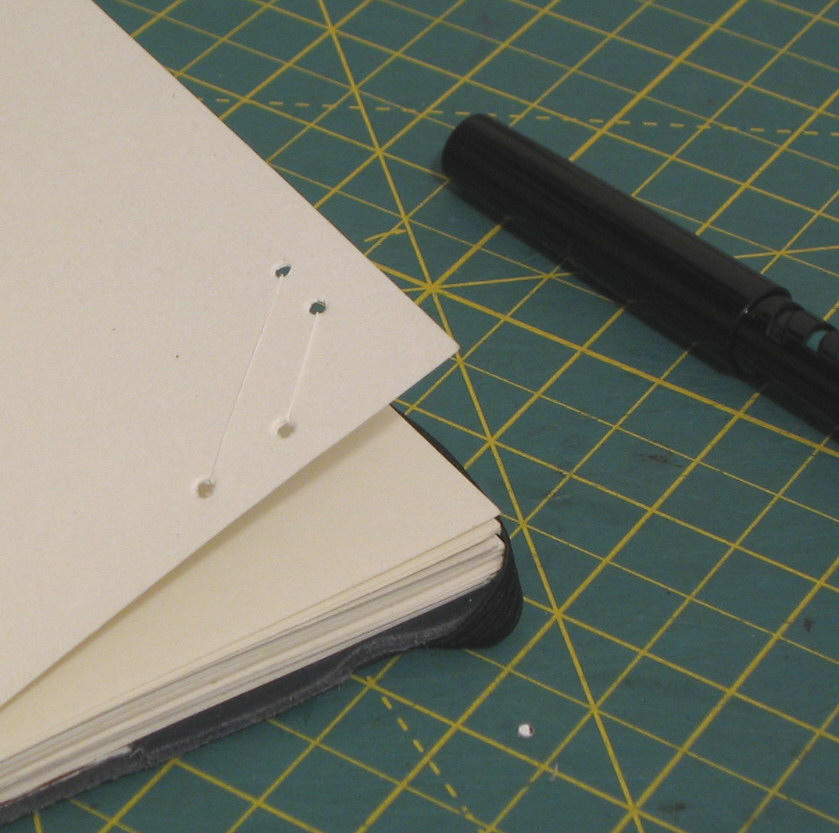
I bought a photocorner punch a few weeks ago. I thoguth it was a corner rounder. Much to my surprise I grabbed the first hedgehog I got my hand on and it produced this:

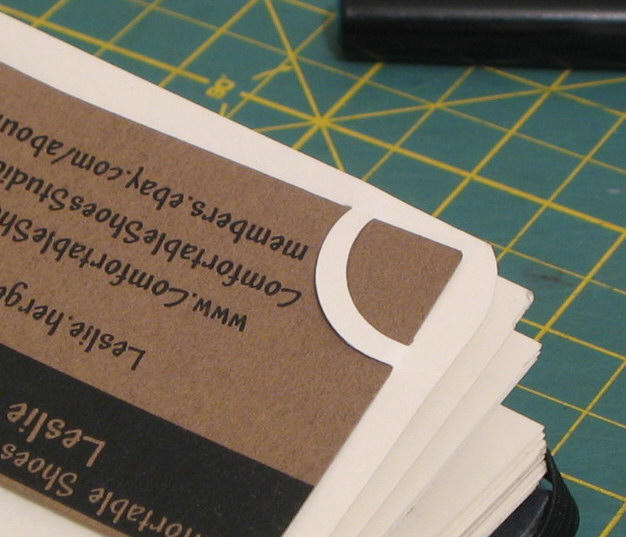
So I shoved a business card in there. i punched a few other pages and if I fold a sheet of 8.5X11 paper just right it fits beautifully into the slot and I can carry it inside my hedgie.

While I was at work I had a messy note shoved into my pocket and I really wanted to put it into my hedgie just the way I had done with my business cards and my map (to the blick store in Boston!) but of course I didn't have my punch with me. It got me to thinking how I could carry a punch with me but not.
Here's my solution. I cut a corner off a priority mailer envelope, about an inch and a half on each folded edge. I then measured against it- roughly a quarter inch from each side a business card. On here I measured a series of 4 holes along the edges of my card. I punched them with my screw punch, and connected the dots on 2 sides.
What i edged up was this:

This slides over a corner and I can cut through the pattern and create a slot to hold material in my hedgie. IF I'm careful it doesn't go through the pattern backside and into the next page of my hedgie.
It creates a straight line rather than the delicate curve of the punch but it's quite nice and holds a decent amount.
I bought a photocorner punch a few weeks ago. I thoguth it was a corner rounder. Much to my surprise I grabbed the first hedgehog I got my hand on and it produced this:
So I shoved a business card in there. i punched a few other pages and if I fold a sheet of 8.5X11 paper just right it fits beautifully into the slot and I can carry it inside my hedgie.
While I was at work I had a messy note shoved into my pocket and I really wanted to put it into my hedgie just the way I had done with my business cards and my map (to the blick store in Boston!) but of course I didn't have my punch with me. It got me to thinking how I could carry a punch with me but not.
Here's my solution. I cut a corner off a priority mailer envelope, about an inch and a half on each folded edge. I then measured against it- roughly a quarter inch from each side a business card. On here I measured a series of 4 holes along the edges of my card. I punched them with my screw punch, and connected the dots on 2 sides.
What i edged up was this:

This slides over a corner and I can cut through the pattern and create a slot to hold material in my hedgie. IF I'm careful it doesn't go through the pattern backside and into the next page of my hedgie.
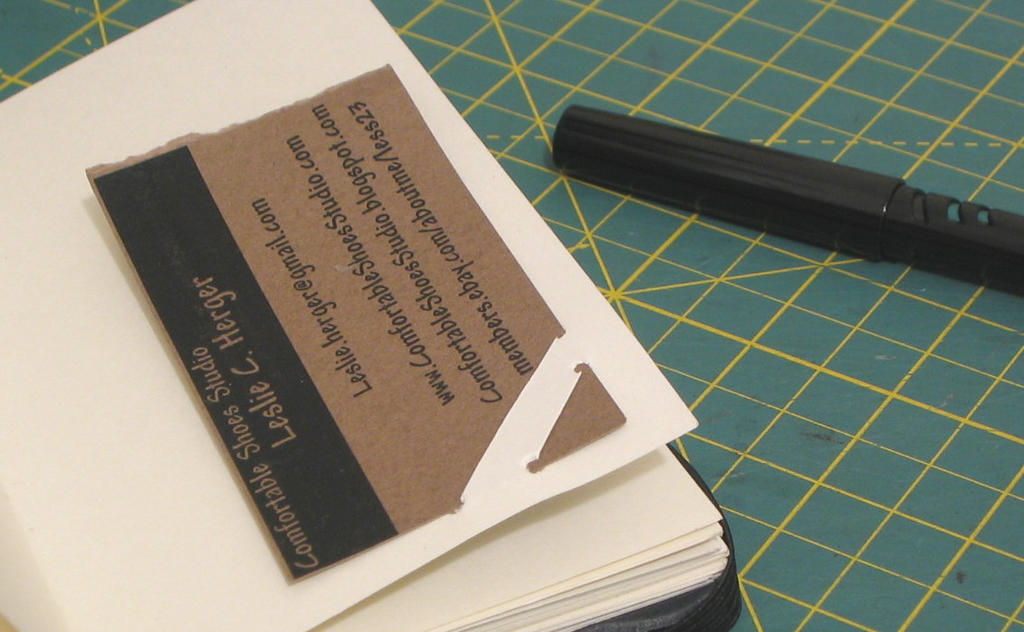
It creates a straight line rather than the delicate curve of the punch but it's quite nice and holds a decent amount.
Sunday, October 16, 2005
A jig for algernon
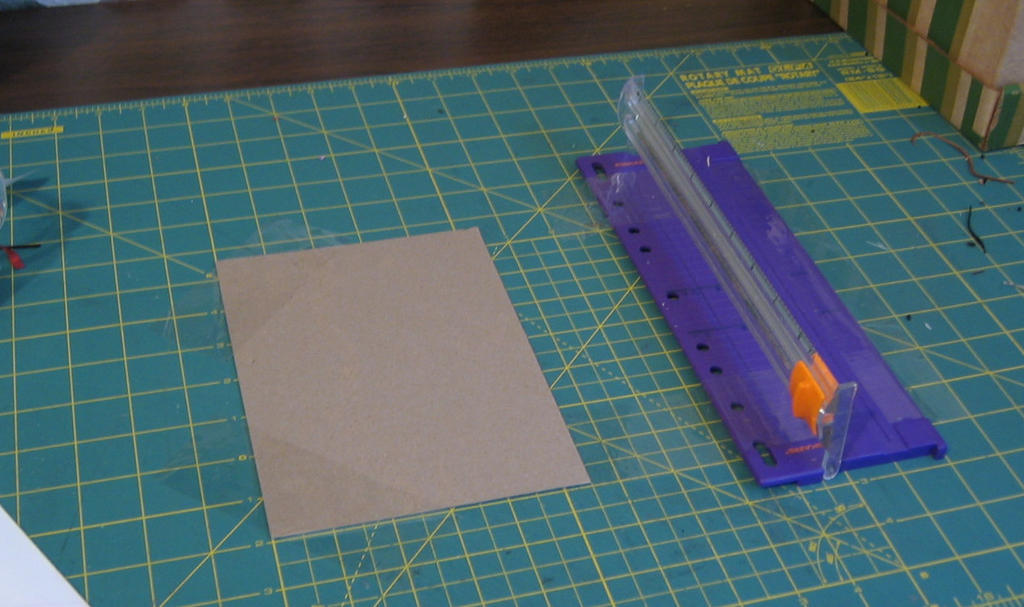
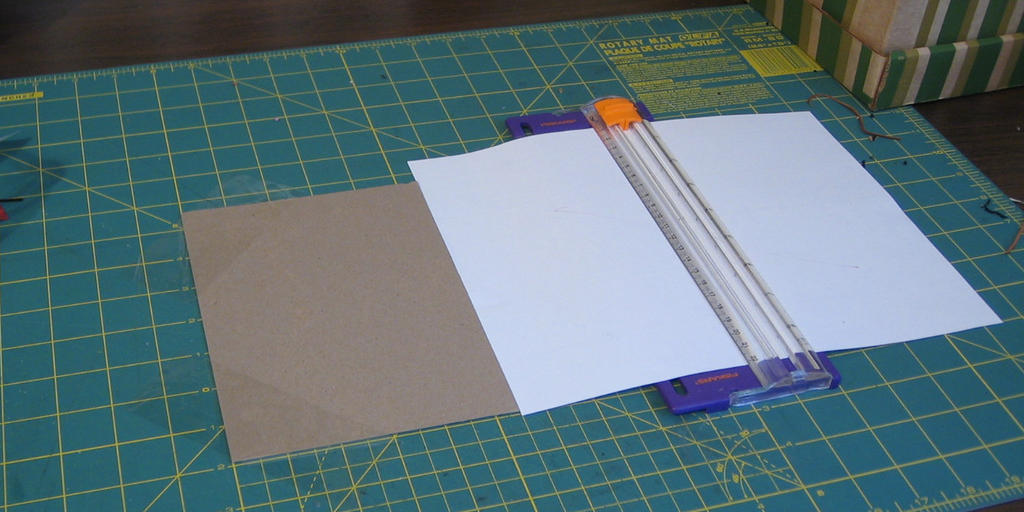
So This is the set up I used before I started to makea lot of books and needed a larger paper cutter.
This is the Fiskars photo trimmer, it trims 2 to 5 sheets at a time and utilizes a fixed blade in a little plastic handle.
I start by lining my trimmer with a line on my cutting mat, if you line it up right you can usethe lines on your cutting mat to cut at specific sizes. I then use duct tape or in this case packing tape to hold the trimmer in place. I put them along the right hand edge.

After I taped the trimmer down I measured from the cutter to where the paper would end on the left side of the trimmer. I butted a piece of waste cardboard to where the paper would end and taped it down also using packing tape. I always tape on the outter most corners and top and bottom ofhte waste card. If the card isn't securely taped down it will lift and allow paper to slide beneath it. Making it useless as a jig/cutting guide.

After it's taped down you can cut away. I always did a few test cuts to check and makesure my measurements were correct, nothing worse than cutting aream of paper only to find out at the last mintue you didn't measure right.
This is the Fiskars photo trimmer, it trims 2 to 5 sheets at a time and utilizes a fixed blade in a little plastic handle.
I start by lining my trimmer with a line on my cutting mat, if you line it up right you can usethe lines on your cutting mat to cut at specific sizes. I then use duct tape or in this case packing tape to hold the trimmer in place. I put them along the right hand edge.
After I taped the trimmer down I measured from the cutter to where the paper would end on the left side of the trimmer. I butted a piece of waste cardboard to where the paper would end and taped it down also using packing tape. I always tape on the outter most corners and top and bottom ofhte waste card. If the card isn't securely taped down it will lift and allow paper to slide beneath it. Making it useless as a jig/cutting guide.
After it's taped down you can cut away. I always did a few test cuts to check and makesure my measurements were correct, nothing worse than cutting aream of paper only to find out at the last mintue you didn't measure right.
Wednesday, October 12, 2005
Thing-a-ma-JIG
I've been asked about my paper trimmer jig. It's a pretty simple piece. I have plans to further adapt it but that will have to wait.
I use a fiskars table top rotary cutter. I like rotary blades because they don't pull and they cut in exactly the same place each time. If I over load the cutter, as I am prone to do, I don't get pulling or hacked edges, it just won't cut through the whole stack.

The jig was made with 1/4inch by 3 inch poplar I boughtit for strip framing a few collages on canvas and this was a scrap.

You may note that I've drawn a big red stripe down the center of the wood. This is so that I know which side is up on the board. It only fits in one way.
I measured my paper cutter bed, from edge to edge. I cutmy board 1/16th of an inch longer than that measurement. My bed was 12 and a quarter inches high. So I cut my board 12 and 5/16th. I used a fines sanding pad and razor blade to trim off minute shavings until I got my board to fit in so tight it wouldn't move easily.

When i cut reams of paper in halves I take one sheet of paper and fold it in half and put it on the bed, measureing it against the blade. I then slip my jig into place. I end up with a ream of paper cut neatly in half and pretty near the same size. Reams of lower end paper tend to have a lot of sheets that are 1/16th to 1/32nd of an inch off which messes with everything. I had a hell of a time getting my Wausau paper the same size. I ended up cutting the ream, stacking the sheets and pulling out the nearly half ream that was a screwed up size and cutting a 1/16th of an inch off. It was a major production and it's a reason I shy away from all the wausau branded paper- including astrobrights. Great colors but not worth the aggravation.
My finall adaptation is to cut 2 slots one at the top and one at the base and coordinating slots in my board. thread screws through the cutter and the board attach washers and wing nuts so that I have a removable but very secure cutting jig. I am however very afraid of damaging the cutter, so that it warps when I lean on it to cut. I dont have any issues with the jig I use now.
Tuesday, October 11, 2005
Mad about angled stitches
I've been binding all day and while i haven't met my lofty goal of making 10 journals idid finish 5 large journals and one small. I still ahvetime to make a few more if I try. I did make it to the post office for shipping a lot of journals to Canada. I also made it to both Barnes and Noble to check out the journals and farm for ideas and to Michaels for cardstock.
While at michaels I realized that I need to find a better source for paper. paying the amount that i'm paying for cardstock is outrageous. Especially whenI know I could call a printing company and get the paper at half the price. ARGH!!!!!!!!!!!
So The journals that I worked on today are all variations on long stitch. Basically it's sew on 2 signatures and then head back as if I were going to start a figure 8 bu angle back into the last signature. I ended up with some very elegant spines. Expect a whole slew more variation on this. i'm pretty excited to try this out with stations and not just slots.
Enough talk here you go:


The golden colroed journal is going up on ebay.
Sunday, October 09, 2005
Big Dark Blue
I'm getting back to loving the chunky weighty journals that have a weight in your hand that is unmistakable.
This is a journal similar to the Big Blue Journal that I have on my website. the difference here is that it's a deep dark almost black blue colored deer hide. It's so soft and smooth it's amazing. I used natural Irish linen thread tosew it up. It's sewn to stations in a pattern of diamonds and wings. The backing paper is a fibery paper that matches the navy blue almost perfectly. It has 340 pages of 24lb Strathmore paper. I love this paper. It's perfect for writingand has a nice tooth for drawing and it will take a lot of abuse- light watercolor washes, glue and it will even handle my fountain pen.
Enoguh Jibber jabber, pictures below.


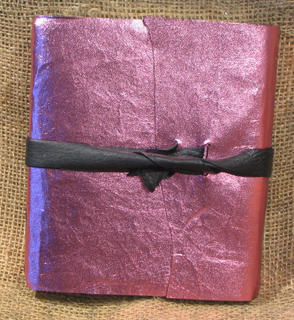
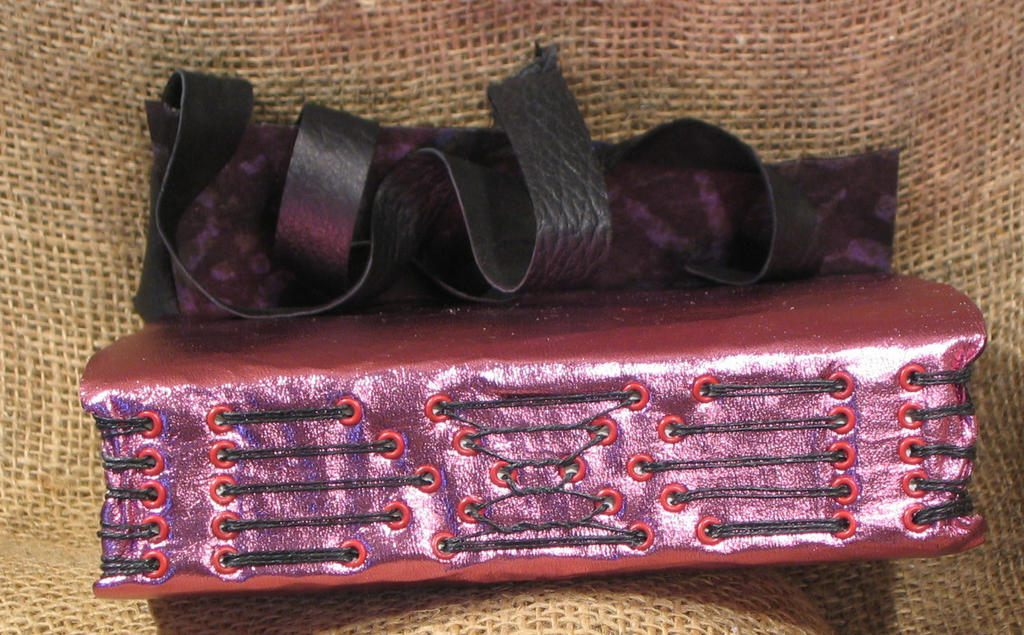
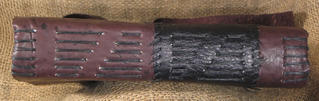
Metallic Pinks
This is a 6x6inch an 2 inch thick watercolor journal. It's got 144 pages of Fabriano Uno paper, hand torn to size. the leather is a foiled leather in raspberry color. I bought red eyelets to match the leather. i used black linen thread to sew. You may recognize the pattern, Iused itfor another watercolor journal a few months ago.
the extra 44 pages really make a difference in weight, this thing is chunky and heavy. i really like it.

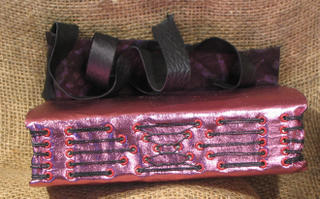
the extra 44 pages really make a difference in weight, this thing is chunky and heavy. i really like it.


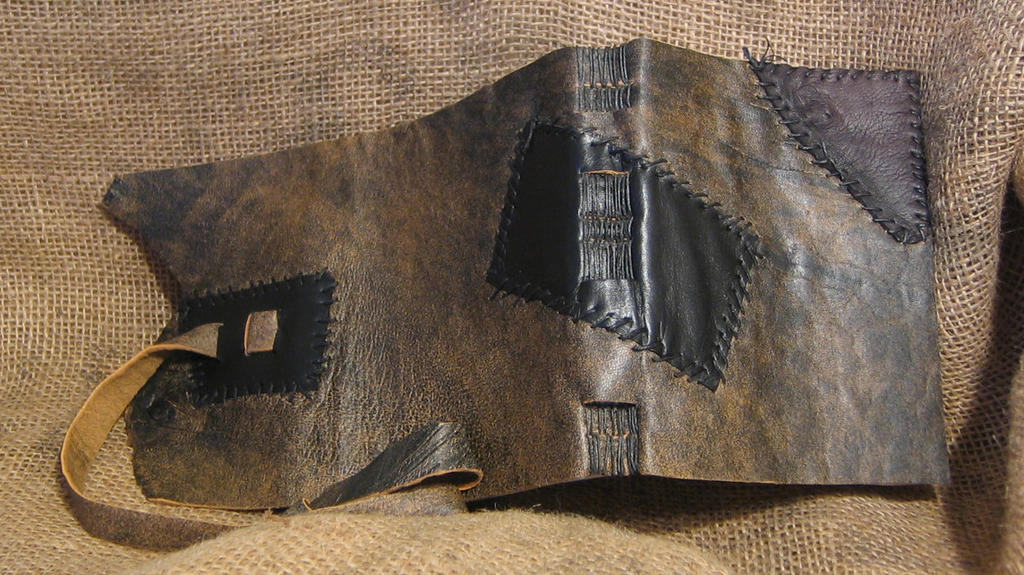
FRANKEN JOURNAL
This would a be a perfect update for halloween,but it's a week or so too early!
I finished what I'm now calling the "franken-Journal style" (Thanks Bart!) journal.
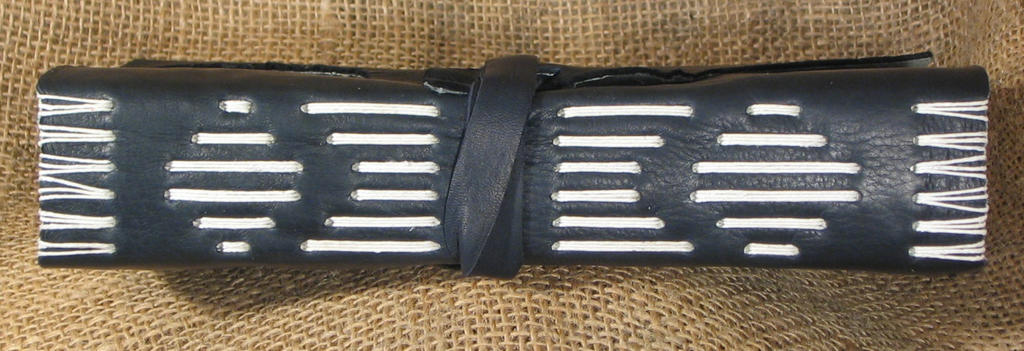
It's big, 8x10 inches, 200 pages of 90lb drawing paper and a unique sewing that is based on how the patches that were randomly sewn across the hide went across the spine. The pictures don't do this oil tanned leather justice. Its a chocolatly brown with darker deeply textured patches and great patterning across the whole thing. The black patches were first glued down and then sewn through the cover. It's all sewn with blacklinen thread. i used as accent some red cotton stitches but I"m not sure how I like them. They are nice enough but I'm not in love with them.
Some FrankenJournal love:


I finished what I'm now calling the "franken-Journal style" (Thanks Bart!) journal.
It's big, 8x10 inches, 200 pages of 90lb drawing paper and a unique sewing that is based on how the patches that were randomly sewn across the hide went across the spine. The pictures don't do this oil tanned leather justice. Its a chocolatly brown with darker deeply textured patches and great patterning across the whole thing. The black patches were first glued down and then sewn through the cover. It's all sewn with blacklinen thread. i used as accent some red cotton stitches but I"m not sure how I like them. They are nice enough but I'm not in love with them.
Some FrankenJournal love:

Saturday, October 08, 2005
3 down and so many to go!
Well, I just put the finishing touches on 3 journals and all 3 complete orders. How fantastic is that? I'm pretty excited about it all. i'll post plenty of pics tomorrow. Its funny how fast time flies by when one is doing something they love.
So tomorrow pictures and lots of them!
So tomorrow pictures and lots of them!
Wednesday, October 05, 2005
Paper
I'm searching for a paper. A paper thats good for light watercolor washes, collage and smooth for writing, it's foldable for binding and isn't too expensive. I'm making a book for someone and they need paper that can handle all those types of work. It also needs to be oatmeal colored. I'm thinking a trip to boston may be in order for this one.
I'm thinking Stonehenge or somerset paper may be the way to go. Both are good printmaking papers that can withstand intalio as well as block printing. Meaning they are tough and stand up to abuse.
If anyone else has any ideas eitehr email me or leave a note on here.
I'm thinking Stonehenge or somerset paper may be the way to go. Both are good printmaking papers that can withstand intalio as well as block printing. Meaning they are tough and stand up to abuse.
If anyone else has any ideas eitehr email me or leave a note on here.
Tuesday, October 04, 2005
attack of the killer hedgehogs
including the 2 hedgies i've got up on eBay right now i've made 9 hedgies in the last week or so. This is on top of working on designs and cutting covers for custom orders.
I strongly believe that on my current art based income i could live in reasonable poverty if I were to move back to Maine, of course this would involve moving back in with my family and living in an area that is best called lovingly remote. I believe at as one enters into their 30s that living with family is well, for the birds. (can you tell that I recenly had a birthday?)
Anyhow enough of my rambling I've got more work to do here before I head for bed so I'll leave you with a nice shot of Hedghog love:
Sunday, October 02, 2005
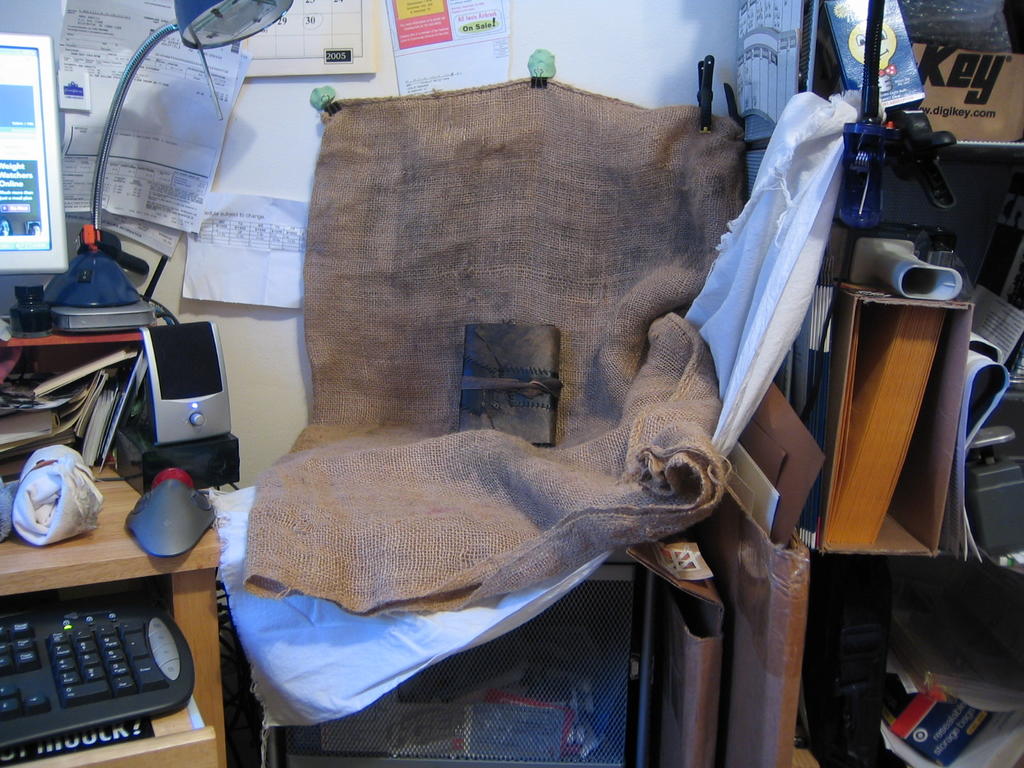
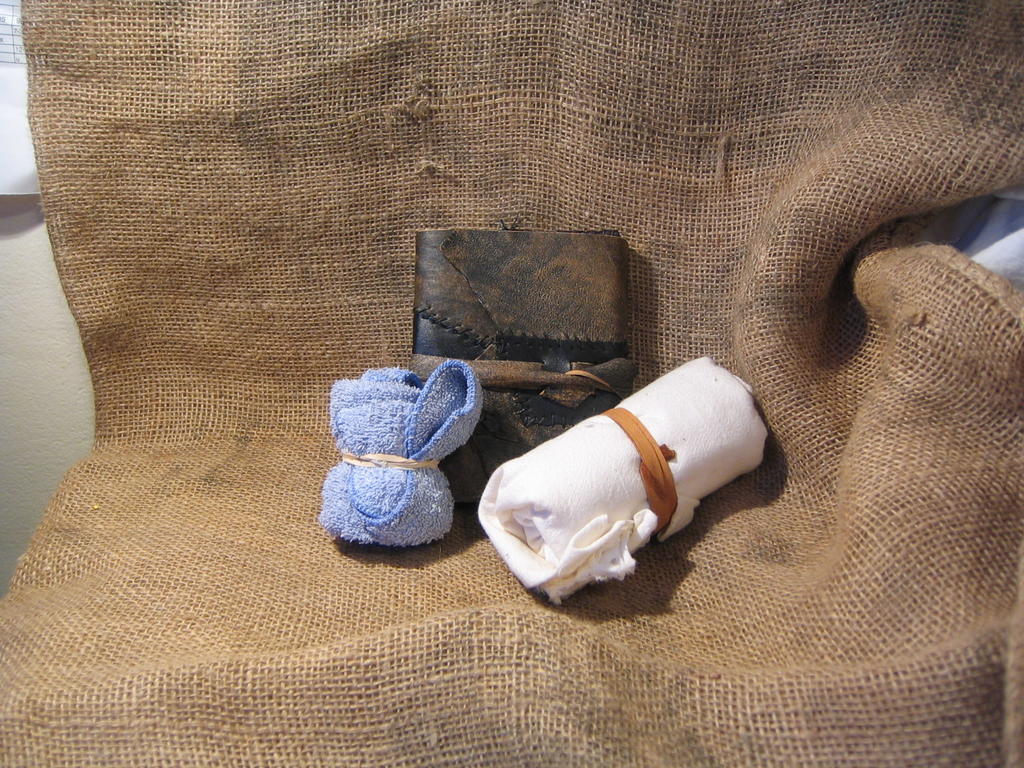
Photo set up
I've been asked about my photo set-up. It's pretty simple. I have a rolling metal cart that I put up against the wall. I use binder clips and non-maring poster putty to hold my backdrop up. I've used just tacks in the past. I've also used a chair. the main thing is that you need a right angle to hold your backdrop and your item.

Because I have a DayJob I don't always have a chance to take photos in the primetime of sunlight, I solved this issue by getting 2 halogen desk lamps with goosenecks. You can see them mounted on either side of my set-up. My canon camera has a setting specifically to handle halogen lamps. For a long time I used just one of the lamps and the overhead lighting in my apartment. For me it was important to get a gooseneck lamp so that I could move the light around to eliminate glare. Sometimes a shot is perfect but I'll get glare, I move the light until I don't see it in the picture anymore. It's very simple.
The other item I use is also very simple- props. I have a washcloth that I secured with an elastic and a dishtowel that I tied with a scrap of leather. These let me lay my books down to get those oh so important spine shots. I like to have 2 of them to ensure I get a good angle on the books.

The only other item that is essential to a good shot of a book is a tripod. Essential, like don't leave home without one. I picked up a basic tripod for elss than $20 at my local walmart. It has a level and most importantly an adjustable head for my camera, letting me adjust everything as i'm working.
This is the closest tripod I could find to mine:
tripod
The major difference with this to mine is that mine has a crank for the height adjustment.
Finally, I've turned off the flash. Flash is evil. Flash causes glare and wash out. It's evil. That's all we need to know about flash. When you turn off the flash it forces your camera to rely on ambient light and thus us a longer shutter timing. Which is why a tripod is so needed.
Just as flash is evil, timer is good. Many cameras have a timer setting. Use it. Its elminates most if not all of camera shake caused by pressing the button. the combination of the tripod and timer will improve shots dramtically. My shots went from slightly blury to sharp theminute I tried this out.
The final aspect of taking a good clean shot of your books is to get to know your camera and what it's capable of. Learn the settings that it has. Take 100 pictures of a book and try out every setting and combination of settings your camera has to offer. It's not like it has film and your losing cash with this- all you have to do is press delete and it's gone. It's time well spent.
My set-up cost me about $40. tripod-$20 Lamps $10 each. I scored a free burlap bag at work and had the black cloth laying around, but I think when I bought that it was $5, I bought 2 yarsd for another project. I also had soem unbleached linen. I have 3 options for backgrounds. I like the burlap because its matches the rough exterior of my journals, it's rugged.
Hope that helps any qyestions one mught have about taking shots of your journals.
Because I have a DayJob I don't always have a chance to take photos in the primetime of sunlight, I solved this issue by getting 2 halogen desk lamps with goosenecks. You can see them mounted on either side of my set-up. My canon camera has a setting specifically to handle halogen lamps. For a long time I used just one of the lamps and the overhead lighting in my apartment. For me it was important to get a gooseneck lamp so that I could move the light around to eliminate glare. Sometimes a shot is perfect but I'll get glare, I move the light until I don't see it in the picture anymore. It's very simple.
The other item I use is also very simple- props. I have a washcloth that I secured with an elastic and a dishtowel that I tied with a scrap of leather. These let me lay my books down to get those oh so important spine shots. I like to have 2 of them to ensure I get a good angle on the books.
The only other item that is essential to a good shot of a book is a tripod. Essential, like don't leave home without one. I picked up a basic tripod for elss than $20 at my local walmart. It has a level and most importantly an adjustable head for my camera, letting me adjust everything as i'm working.
This is the closest tripod I could find to mine:
tripod
The major difference with this to mine is that mine has a crank for the height adjustment.
Finally, I've turned off the flash. Flash is evil. Flash causes glare and wash out. It's evil. That's all we need to know about flash. When you turn off the flash it forces your camera to rely on ambient light and thus us a longer shutter timing. Which is why a tripod is so needed.
Just as flash is evil, timer is good. Many cameras have a timer setting. Use it. Its elminates most if not all of camera shake caused by pressing the button. the combination of the tripod and timer will improve shots dramtically. My shots went from slightly blury to sharp theminute I tried this out.
The final aspect of taking a good clean shot of your books is to get to know your camera and what it's capable of. Learn the settings that it has. Take 100 pictures of a book and try out every setting and combination of settings your camera has to offer. It's not like it has film and your losing cash with this- all you have to do is press delete and it's gone. It's time well spent.
My set-up cost me about $40. tripod-$20 Lamps $10 each. I scored a free burlap bag at work and had the black cloth laying around, but I think when I bought that it was $5, I bought 2 yarsd for another project. I also had soem unbleached linen. I have 3 options for backgrounds. I like the burlap because its matches the rough exterior of my journals, it's rugged.
Hope that helps any qyestions one mught have about taking shots of your journals.
Custom Journals
I love making custom journals for people. It gets me a chance to experiment within guidelines. I think that this sort of thing was never something covered in my college art courses. I learned about stiring my creativity and geting customers but never about filling orders and how to learn what people really want. I've learned that through the time I've been making books and throguh working at the store. I think it's skill that I've learned.
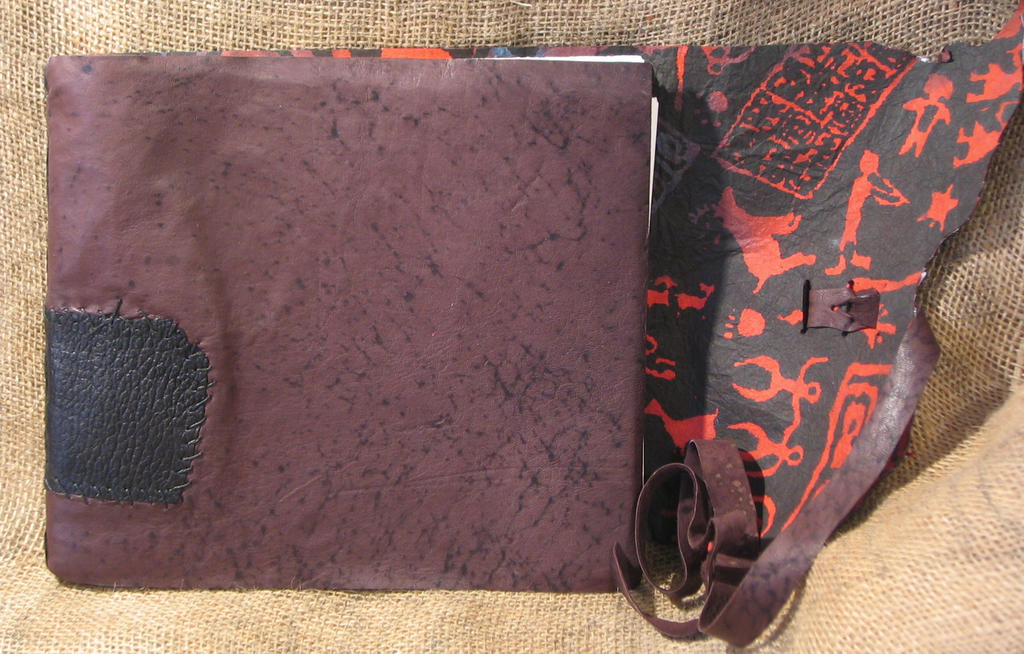
I've been working on an order for 4 journals. I've beengiven permission to do whatever I want withteh bindings and been told "You are the artist, let my creative vision go wild." Needless to say I'm pretty excited about that. So I'm going to show a few pictures here of the 2 journal I"ve finished in this order. the first is a golden deer skin color. With some gray areas in the skin, also some scars in the skin. Ilove skins that are naturally distressed and show the life of the animal. It's probably one of the reason I'm drawn towards deer and sheep hides. Not only are they super soft but they are themost interesting hides I've ever bought. Goats nice but somewhat boring. Cowhide is boring. Anyway, without any more digression on my part!

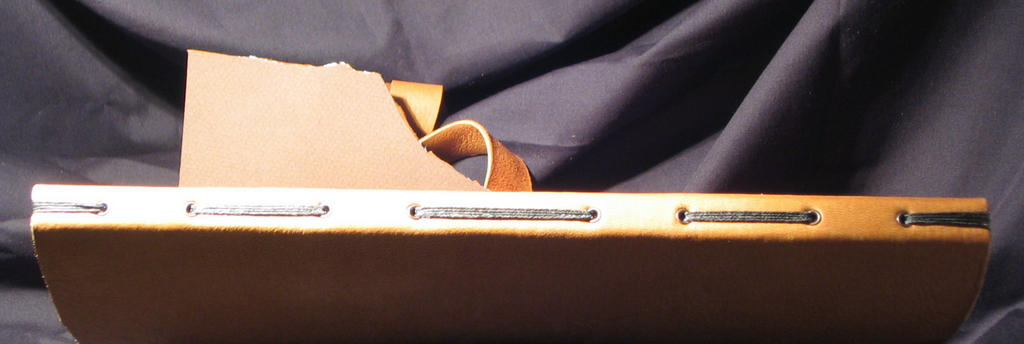
It's 9x11 inch journal with 48 pages of 90lb strathmore cream drawing paper. It's backed with canson paper in tobacco. the spine features a simple sewing of hand dyed black unbleached Irish linen thread sewn through station reinforced with antiqued copper eyelets. The photos of the spine didn't come out well but here's the best:

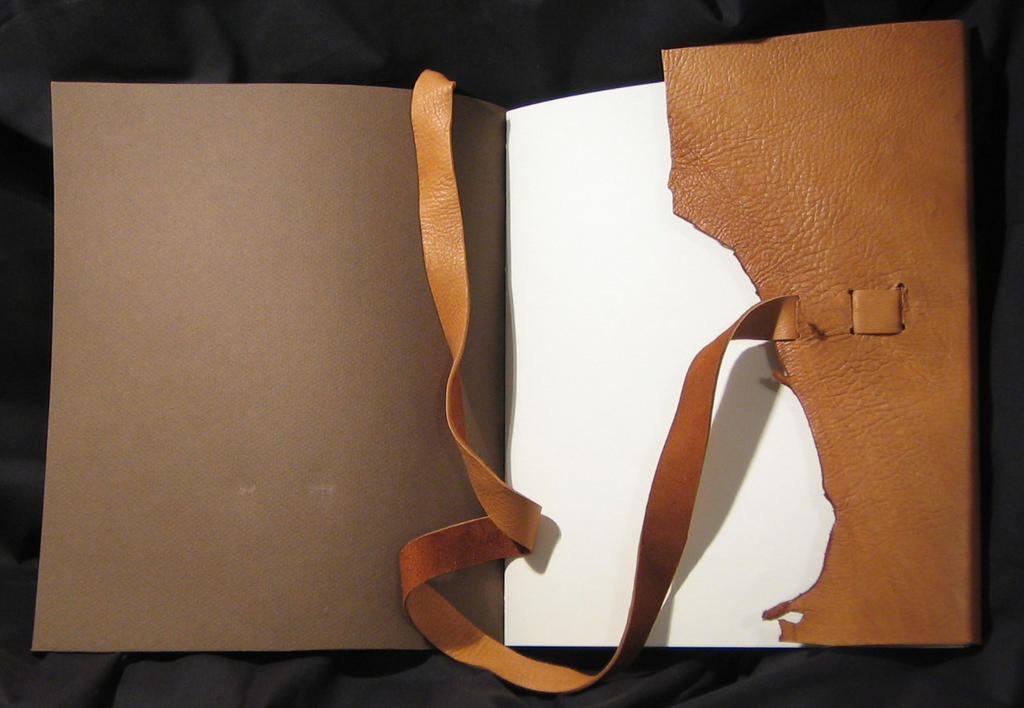
Finally the gratitous cover open shot:

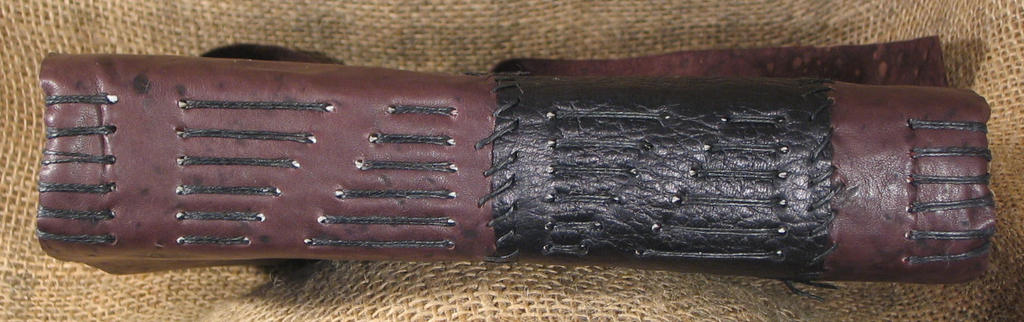
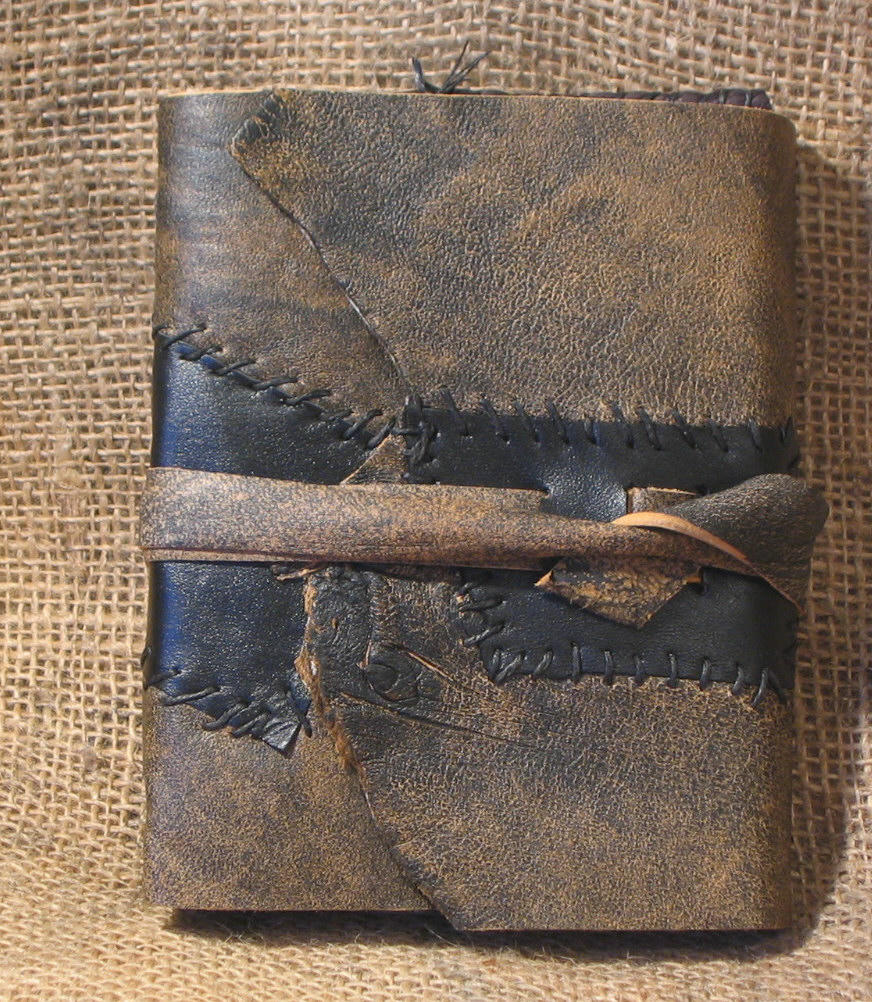
The second journal is what the guy calls a "franken"journal. I think it fits. I made one of these for my friend B and it was inspired by the punk rock patches he wears on his jeans and jackets. I like the name and ithink it will stick:

It's a standard journal cover with patches glued to the outside and then handstitched to the cover with linen thread. To sew it all the holes must be pre punched- it's hard to push a needle with thread through leather unless you've pre-punched the holes.

Here's a shot of the whole cover:

Those are the 2 most recent books I've made. Hope you like
I've been working on an order for 4 journals. I've beengiven permission to do whatever I want withteh bindings and been told "You are the artist, let my creative vision go wild." Needless to say I'm pretty excited about that. So I'm going to show a few pictures here of the 2 journal I"ve finished in this order. the first is a golden deer skin color. With some gray areas in the skin, also some scars in the skin. Ilove skins that are naturally distressed and show the life of the animal. It's probably one of the reason I'm drawn towards deer and sheep hides. Not only are they super soft but they are themost interesting hides I've ever bought. Goats nice but somewhat boring. Cowhide is boring. Anyway, without any more digression on my part!

It's 9x11 inch journal with 48 pages of 90lb strathmore cream drawing paper. It's backed with canson paper in tobacco. the spine features a simple sewing of hand dyed black unbleached Irish linen thread sewn through station reinforced with antiqued copper eyelets. The photos of the spine didn't come out well but here's the best:
Finally the gratitous cover open shot:
The second journal is what the guy calls a "franken"journal. I think it fits. I made one of these for my friend B and it was inspired by the punk rock patches he wears on his jeans and jackets. I like the name and ithink it will stick:
It's a standard journal cover with patches glued to the outside and then handstitched to the cover with linen thread. To sew it all the holes must be pre punched- it's hard to push a needle with thread through leather unless you've pre-punched the holes.
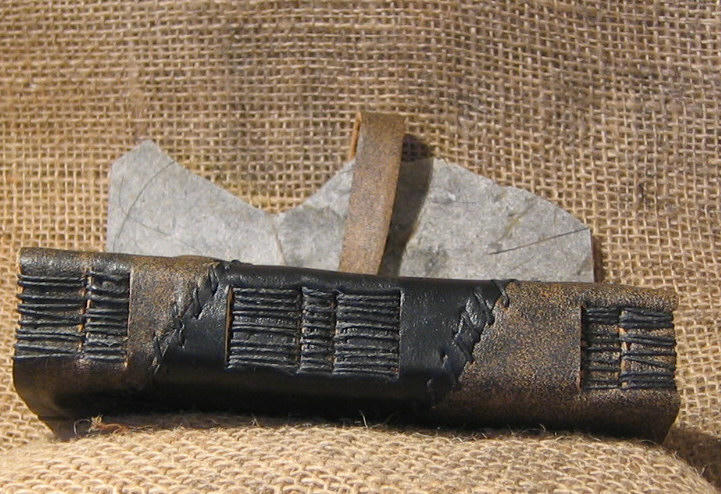
Here's a shot of the whole cover:
Those are the 2 most recent books I've made. Hope you like
Subscribe to:
Posts (Atom)
Spent the morning getting this DONE!!! 4 teens 2 adults churned out 72 screen printed shirts annnnd some special surprises for people. Killin it! These are awesome!
via Instagram https://instagr.am/p/CsMqeQMPXxt/

-
It’s time I posted some pics here about my planner. You could term this a moleskine hack, or a love affair. I’m not sure which it is. All I ...
-
I use the weaver's knot pretty often, somtimes I don't cut the thread long enough and osmetimes it's just too unweidly to use a ...

