Comfortable Shoes Studio is the name of my little studio in Beverly, Massachusetts; here I paint large watercolors, smaller acrylics, and mostly bind books and journals. I specialize in custom bound journals and sketchbooks with adhesive-free sewing in which the sewing is visible and decorative on the spine. If you're interested please email me!
Thursday, November 30, 2006
New Laser Printer
I did a little research and found a inexpensive back and white brother, on sale for $119, Staples offed it up with an additional $40 off, so at the out set with tax I ended up spending $85. They were then offering an additional $20 rebate. I figured that $65 for a new laser printer wasn't bad. Also a little poking around revealed that the toner cartridges are available for $60 or so and print about 2500 to 3000 sheets. At full retail that ends up being 2 cents a sheet. Which is much cheaper than an inkjet. While the initial cost is higher, the money spent in the long run is much less.
Also the lines that I printed with a laser printer are much much better than those printed with an inkjet. It's also better for printing postage from online since it doesn't run if it gets damp.
Monday, November 27, 2006
Hedgehogs
I royally screwed up on one of the hedgies. When I glued in the pocket in the back I accidentally glued it 1/4 of an inch in from the edge rather than flush with it. Since I've been debating if I wanted to keep/make myself one with this particular leather I've decided to keep it for myself.
Here are some pics to keep you busy until you head over to ebay/ etsy.


This one is mine:

Sunday, November 26, 2006
New Lowered Price
I also added a new journal to the ranks of etsy.
I also have 2 journals ending on eBay tomorrow.
Service Provider
I'd like to get ideas of what people use and have good luck with, send me an email (through the profile section) or leave a comment
Website, moleskines and pencil
Moleskines will be ordered tomorrow.
If this wesite takes off, this will be the most perfect job of them all, I'll get to work with rt supplies all day every day. How freakin' cool will that be?
Vise with Hedgies
Laptop Stand
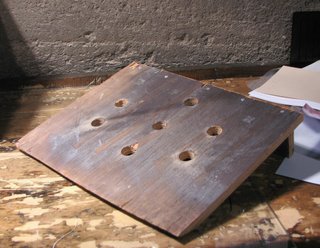

 The only modification that I would make next time is to cut the back riser at an angle, so that it sits flush with the table.
Household Chores
To paint the upper reaches of the oddly shaped stairway it required that a piece of plywood be cut to fit into the stairway, so that step ladders and paint could be placed on it, with out the plywood,they were impossible to paint, even with extension rods.
That being said it's been a slow couple of days for the studio. I did cut 6 covers for hedgehogs this AM a glue them up. Right now they are in the vise drying and waiting for me to trim them and add elastic and a pocket. I use some really nice leather for them and can't wait to see what the vise does for them! I was able to really crank it down and use some HEAVY pressure. It will be even more nice to see how well they turn out with the added pressure.
So I have 2 journals up n eBay with day left, go check them out HERE!
I'll post some pics of the vise with hedgies in it and some pics of the laptop stand.
I had a great brain storming session about lead protectors for pencils. I'm not posting anything about it until I get the idea fully worked out, and a few prototypes out of the way. It could be very cool.
anyway, I need to get working while I've got the time to do it. Expect some hedgies up on ebay soon!
Saturday, November 25, 2006
Laptop Stand
Now to do some work on the websites.
I will be ordering Moleskines on Monday. Which hopefully means that you'll be seeing them on the site by Friday or Monday of the following week!
Tuesday, November 21, 2006
More Website Garbage!
Monday, November 20, 2006
ebay


I used Southworth 24lb Ivory laid paper, unbleached line thread and did some linking long stitch on the large book. I was pretty happy with w these came out.
In other good news I got the sutures in my finger removed, so I no longer have to wear a nasty band aid all day. When I come home I ca remove the band aid and have full use of my finger! I'm a pretty happy camper. (My finger is also healing nicely)
Sunday, November 19, 2006
5 of 6 ain't too bad
Here's a pic of the stack getting ready to have the spines designed and punched.

I thought that they came out pretty cool. I made 4) 5.5x4.25inch 200 page journals and 1)6x9 inch 200 page journal. I messed around with some patterned stitching, and some linking long stitch. I'll post some pics tomorrow. I'll be listing 2 on ebay and the other 3 on etsy.
I also spent copious amounts of time working on the website. My brother got me the rest of the buttons this AM, and many of them the day before so I was able to tweak a lot of the links and get thing that I wanted up like a FAQ,Links Page, and a few others.
Tomorrow ebay and etsy.
Saturday, November 18, 2006
The Jig
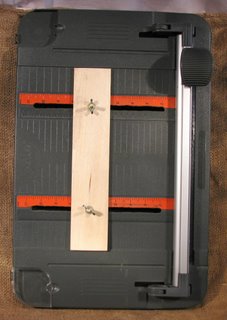
This is a pic of the underside in case you were wondering where to make the cuts. I think I need to add a lock washer between the bolt and the washer- to eliminate the spin when I tighten the wingnuts.

Here's the top with the bloc all the way to the left. I had thought that making the cuts would weaken the top a lot, making it unstable and thus making cuts that were crooked. What I hadn't thought of as that the wooden block could act as a stabilizer when the nuts were tightened. I will say that when the block is loose or not in place there is a huge amount of flex in the top.
 And here is a close up of the underside. It shows what a crappy tool the dremel was for this job, it melted the plastic far too easily to be of any use. It also shows how far back I had to trim the supports so that the washer would pass.
SOme notes about this project: Next time I would chose a screw with a smaller diameter, this would decrease the slot in the top, the cutting time and overall make this an easer task. I would also get a shorter screw- a 1inch would have been more than enough. A small carriage bolt without threads for the first 1/4 inch would have been a good idea as well. Anywhere with unevenness allows for the threads to get caught and makes smooth travel difficult. I would also bore the holes in the wood block larger, allowing the bolts a little travel, i think it would make adjustments easier. I would get proper tools for the job. The dremel sucked at this but then, perhaps using a different bit would have been better. If I used a narrower bolt I would have been able to use my saw and cut a single cut. But then anything would have been easier than drilling 60 or so holes and then trimming out the remains with wire nips.
All the moaning and groaning aside, this came out pretty sweet if rough looking. It works well and i think that with a few ore modifications it will be damn near perfect for my uses, and if I get another paper trimmer I'll be doing a similar mod.
Pics of the Vise

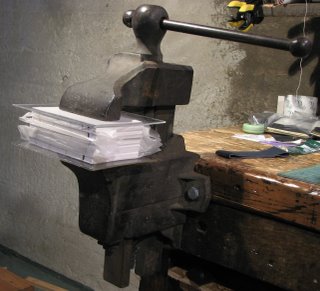
And above is a pic of it closed over 5 hedgehog blocks. My theory is that it will hold a ozen hedgehogs with ease! How freaking awesome is that!!!
NO all I have to do is build the stiff wooden blocks to fit over the jaws...
The Vice and the Jig
I bought
2 brass 1/4in 1.5 in round headed screws
4 brass washers to fit the screws
4 steel wing nuts (they didn't have brass and they only came in a 4 pack)
I then decided where to cut into the bed of my cutter. I figured if I went right along the rulers Id have a ready made guide. What I didn't think of or notice that this was the thickest area of plastic on the whole bed! and thus it was harder to cut than anywhere else!.
I then made 4pilot holes. I had intended to use the routing bit my dremel and route the area of travel out, his proved to be both too difficult, because of the speed of the dremel and the cheapness of the dremel routing kit. I then took my drill and drilled holes consecutively until I had a series of 30 hole next to each other for each path.
It was a lot of plastic.
I then used my wire cutters to "nip" out the remaining plastic between each hole. Again it was a l of plastic. I used my dremel to smooth out the remaining areas of plastic. After that I installed the screws, washers and nuts. I used a 1/4 inch thick piece of hardwood I had been using as a jig as the stop bloc. I drilled 2 holes for the bolts and pushed the bolts up through the wood.
I moved the stop block around to find where it would stick and stop I used a knife to shave off small amounts of plastic until it moved smoothly. Now I can slide the wood to where I need it to be, lock it down with the nuts, and cut away, and there is NO WAY this baby is moving ANYWHERE!
I will post pics later.
The Vice should be an entry all on it own, BUT here goes. My work bench came with a huge charming antique vice. I'm in love with it, it's heavy, patina'd with age and use, and did I mention it's awesome!?! I knew that it was of no real use to me in it's normal postion, gravity would make everything slide out of it. So I positioned it on the front of the bench so that the grip works up and down, LIKE A BOOK PRESS!!! The jaw is deep for a vice but not really deep enough for a press, but it is perfect for my hedgehogs! I plan on making some over sized wooden jaws that will make it more useful to me as a press.
Again pictures a little later today.
buttons
Anyway, I'm feeling like the site is finally coming together, both image-wise and product-wise. I'm bursting with ideas and happiness. "vce got some kinks to work out a I think that by the end of next weekend I'll have a majority of my product ordered and hopefully in stock.
For today I've got some goals but I'm hoping to spend a fir amount of time in the studio to get some books made.
Friday, November 17, 2006
Leather PenSlips
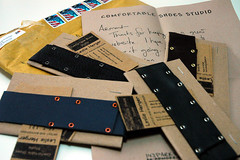
Leather Pen Clips
Originally uploaded by bluman.
My penslips finally got to Armand from Moleskinerie! He took a nice publicity shot and posted it on flicker. Sweet!
Also, my webpage is limping along, take a look and let me know what you think! ComfortableShoesStudio.com
Thursday, November 16, 2006
dreaming weaver
I took my new found mastery of the program and immediately made a template so that no matter what I do, all my pages look similar.
When I pulled the screen up in Firefox and IE and it looked the same it was a happy moment in my life.
That being said I hope that Saturday I can get the new front page of the site up. I also hope to get the new
I decided that I would put the rough page up and have some functionality NOW versus waiting, I’m terribly impatient when it comes to these thins. When viewing it please realize it’s a first draft I’m waiting on getting the buttons and a few other custom elements. But go ahead take a look and let me know what you think. Please let me know if there are ay broken links or anything that is working funky.
http://www.ComfortableShoesStudio.c
Tuesday, November 14, 2006
retails
I also designated retail prices for the pencils and sharpeners that arrived today. I'm still looking for a wholesaler/distributor for G2s, ECOwriters, Pitt Pens and a few other items (Note, if you work for a company who wholesales those items with a fairly low intial order- feel free to contact me, email is through the about me link.)
SO the price list is as follows:
Palomino 12 pack assorted Grades in Hard Clear plastic Case with an Eraser $14.99+shipping
Palomino Colored Pencils 6Pack $6.99+shipping
Palomino 6 pack Pencil grade 2B or HB $5.99+Shipping
Palomino 6 pack 3)2B and 3)HB $5.99+shipping
KUM Long Point Pencil Sharpener $6.99+Shipping
KUM 2 Hole Brass Sharpener $1.99+Shipping
Shipping will be reasonable for most of these items, they don't weigh much and will require only a little bubble wrap. Probably $2 for most and obviously more for the 12 pack in hard plastic. Obviouly rush shipping will be more...
I'll have these up on the website but if anyone is interested earlier feel free to drop me an email about what you're interested in. I accept paypal.


Admit
I'm a convert to their HB. I haven't tried the other grades but the HB is the smoothest pencil. I wrote a bit with it, and I didn't break the point off, even after sharpening the pencil with the KUM long point sharpener to a fine point, I didn't snap it off. The laquer is smooth and shiney and overall it's an attractive pencil. It handled the kraft paper in my notebook well and has dulled slowly with my heavy handed pressure.
I give these an A+.
I'll be offering a mix of sets at several prices. I may open some stock and offer single pencils.
Anyway here is what I want Christmas to look like:


First
Massively happy.
Monday, November 13, 2006
vegan.....
The phantom vegan journal! I believe that there is not much out there that can outlast a good quality leather journal nor can anything really give the look of leather, however there’re are many options out there for the vegan and many that I’m more than willing to explore. I love a good challenge and I’ll undertake this as I would any other challenge.
There a many options out there for those of us who are vegan, while I now eat meat, there was a time when I did not, hard to believe for someone who handles leather on a regular basis! In fact the first time I bought a hide I was rather grossed out by it. I guess in the years since then I’ve gotten past it, but still I like to know that the lamb hide I buy is a by-product of the meat industry, the animals were not killed for their hide. Believe it or not, I choose to buy hides that many bookbinders would not because of this fact. I’ll not go into my political and social beliefs about the meat industry but I feel I have an interesting perspective due to my upbringing and due to the industry that I now work in (my DayJob not my bookbinding.) That is a discussion I’m willing to take up in email but not on my bookbinding blog.
AS for vegan books and materials I suppose canvas would be a great option for a journal, it could also be decorated to simulate the look of leather. A good quality acrylic paint could fill in the surface and remain flexible, while the various colors of acrylic could give it the color and various acrylic mediums could give it the finish. That being said it would take some experimentation to get it right.
I hate vinyl and wouldn’t suggest it to simulate the look of leather, perhaps some of the other leather replacement options out there? (On a personal note- virgin vinyl is pretty evil environmentally. I one were to go after the vinyl option I would suggest recycling it. Like freitag or one of the other places that recycles vinyl signs, I bet if you went into your local grocery store and asked them for their old sis to recycle they might give some up.) Vinyl is also pretty easily decorated, any one out there have any suggestions for decorating vinyl?
I’m going to have to spend some time in the studio and experiment.
Sunday, November 12, 2006
Friday, November 10, 2006
Thursday, November 09, 2006
cut the cheese
In traditional CSS manner here is a gory picture of my sad finger- 3 stitches and all, please don't click through if you can't take it. It is HERE.
I feel pretty stupid, it was a silly accident. LUCKILY it is on my left hand and appears to only impair my ability a little bit. While I'm out of work for tomorrow luckily I also have the weekend off it shouldn't affect my book making at all, as bookbinding is both clean and dry, something one cannot say about floral.
POcket Notes
I think they turned out really well.


Very vEry exciting
I have a sewing machine and up until now I haven’t done much with it. Sure I had stitch up the hems of almost all my pants and perhaps even a few books. As such I didn’t do much with it, it literally collected dust in the basement.
Last week I had some hemming and patching to do (damn favorite jeans always ripping out!) so I set up my machine, and lazily left it out.
Last night I stared at it for awhile, stared at my pile of hedgehog leftovers and stared at my pad of Strathmore renewal in black; and the thought formed in my head that perhaps I could make my own cahier style note book, which I think is referred to as a cicada on the hedgehog list. I’ not sure I’ll call mine that. But it’s a simple machine stitched notebook with 60 pages with a black card stock cover. That’s it simple and sweet.
I’ll post some pictures later, I didn’t take any, but these were so simple to make I couldn’t believe it when my sewing machine slipped through the paper like it was butter, no matter how many sheets I tossed under it.
I plan on making these with my usual assortment of papers and with black covers, later I’ll move onto other colors. Just think, these could come in a rainbow of colors; any color that card stock, canson, or scrap booking paper comes in. The possibilities are endless. I’ll be doing 50 pages pocket sized in a 3 pack, for an undetermined price. I’ll figure out other details today.
Here’s a quick disclaimer: I am using an extra heavy-duty needle, one you would use for hemming jeans or the like. I DO expect that it will dull VERY quickly on the paper. I’m thinking of how often I change blades in my exacto and it’s often.
Wednesday, November 08, 2006
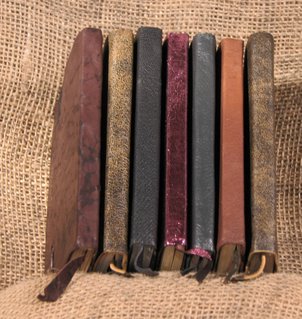
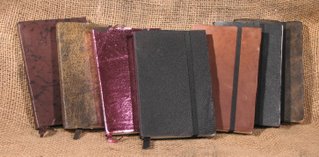
7 hedgehogs all in a row
I'm putting up 2 on ebay now and they are here and there I'll have ome up on my etsy account later.
Monday, November 06, 2006
first order
very exciting.
even if it is just pencils.
I received a catalog in the mail, with pricing info and what not- very reasonable. I will be hopefully placing an order asap from them.I'm going to work on the website while i'm in Maine, so y can expect to see some serious movement on the site ASAP. I st need to get my work schedule settled down.
Sunday, November 05, 2006
Workbench
Today we took a nice walk to the beach, about a mile each way, ran the dog on the beach, walked home stopping at Atomic Café to drink lattes and munch on bagels. I’ll pass on the bag next time and definitely get the latte. I took a long nap a then hit the studio.
I decided to play around with some perfect binding. I cored a box of about 1000 sheets of 8.5x14 inch paper, cover weight probably 70 lb or so. Its stiff and nice, but printed in green on one side with information about olive oil. I cut it down to 4.25x5.5 sheets stacked them and cut kerfs into the edge (I’ll have to look in the book binding term for this, for now I’ll use the wood working term) spread glue all over and then threaded in a piece of thread, glued it again and let it dry. After letting the whole stack dry I measured out the block height (1/2 inch) and cut the glue and the thread. I added a bookmark and a spice reinforcement strip and then glued on the covers. I had planned on using signs I snagged from the store, only to realize at the last minute that I had cut them for regular moleskine size and that I needed to cut n covers. I decided to use a different set of signs that were also recycled from the store- a vinyl coated sign that is printed huge so when I cut a moleskine sized chunk out of it its all blurry and interesting looking.
I’m interested in seeing how this little experiment holds up. I plan on giving them as gifts to people at work. I’ll be making a few more before I sell any.
In addition to the recycled books I made I also cut, folded and punched stations for about a dozen hedgehogs. I’ll be cutting covers tomorrow after work and I think I’ll be able to get the majority of them sewn tomorrow. I hope to get a bunch of them glued up tomorrow too.
IT makes me super happy to walk into my studio and think #1 Its mine #2 I can set it up and move it around however I want. Know that I can leave a project set up on my bench is great too. Just having a spot specifically for everything is great too.
Website
I’ve found vendors for nearly everything. I plan on selling the following journals: Moleskine, Ciak, Xonex a hopefully Miquelrius. I’ll be adding products slowly to the line. My hope is to start with moleskine and add from there. I also plan on carrying a few essential pencils and drawing utensils. They will all be my favorites as is the plan with everything on the site.
I’m starting small; my plan is to start with moleskine pocket sketchbooks, large sketchbooks, and cahiers of both sizes. I’ll then start adding to that with lined moleskine and the other products I then plan on adding Xonex and Ciak to the mix.
As for pencils and pens I’m carrying Palomino pencils, Faber Castell Design 3800, Pitt pens, Pigma pens and black, blue and red G2s and minis.
After that I’ll be looking at watercolor sets and colored pencil sets.
I’m hoping to have the website up and running by January, rather that is the goal.
Saturday, November 04, 2006
THe studio
here are some pics:
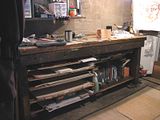
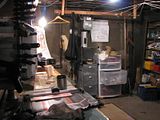
Check out that bench. The top is 3 inches thick, the storage area is 3ft high, and 22 inches deep and I think around 8 feet long.
When we moved in the bench had a door (in the far corner of the studio, not sure if its visible or not)and then applied 6 or 8 coats of polyurethane to its top and 2 heavy coats to the entire inside. I then took some scraps from the door and built a center divide put in supports and then cut shelves for the full sheet paper storage!
Pretty exciting.
Thursday, November 02, 2006
First Journal at Park Street Studio
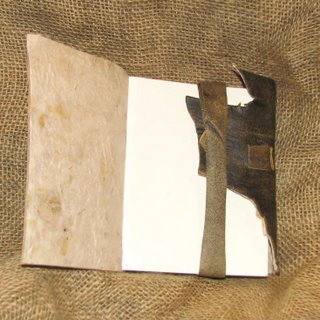
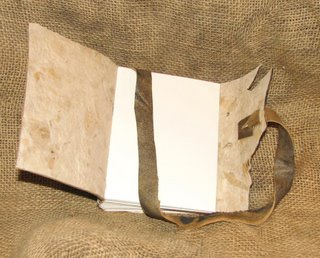
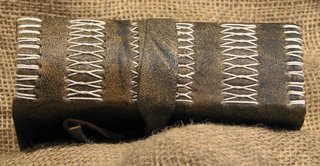
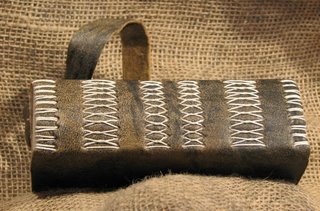
The binding is stitched with naturally colored unbleached Irish linen thread, lightly hand waxed. It’s a linked long stitch, simple and elegant.
Cleary I’m pretty happy with it.

Spent the morning getting this DONE!!! 4 teens 2 adults churned out 72 screen printed shirts annnnd some special surprises for people. Killin it! These are awesome!
via Instagram https://instagr.am/p/CsMqeQMPXxt/

-
It’s time I posted some pics here about my planner. You could term this a moleskine hack, or a love affair. I’m not sure which it is. All I ...
-
I use the weaver's knot pretty often, somtimes I don't cut the thread long enough and osmetimes it's just too unweidly to use a ...
