Showing posts with label recycled. Show all posts

Sunday, September 16, 2007

ebay listings

It’s been a long week for me here. I’ve been working extremely hard at the DayJob which has left me still little time to work on books. It will pass soon. We’re hiring for the missing person and all should be better after that.

PHEW!

However I’m listing some of my backstock items to eBay, you can see them here.

I’ve got 2 sets of 6 jotters, 2 one off graffiti jotters and a large hedgehog journal covered in marbled brown leather- it’s awesome.

I’ve also started to rededicate myself toward making art. I’m focusing on working in my moleskine with gouache and painting things out of the news. I should say people from the news.

I’m getting half as much done on books as normal and it’s frustrating me. I’m almost done with a hedgehog project that I started weeks ago only to find that I’ve not gotten it done… I’m like 2 steps from finishing it… GRGH, silly mortage, why do I need to pay you? Kidding.

Thursday, September 06, 2007

oh ebay you fickle thing you

Well, after yesterday I had hoped that my listings were safe but fully expected them to come down. So this morning when I got up I wasn’t sure what to expect. So to check my email and find that 2 of the 3 remaining listings were gone didn’t surprise me, but the randomness of the removal is what gets me. The final listing also had the same string of keywords and was also listed at the same time. So I don’t get it.

I understand that I’m in violation of the rules, but I’ve literally been listing with those same titles for years, with not one peep of rules violation or warning or indication that they were in violation of the rules.

I also removed the word “like” from my listing, replacing it with “better than.” Both of those listings were removed. However, the words “better than” were not on the list.

I sent a note to eBay regarding the matter and apparently you can’t compare your items at all to another in the listing title. So I can’t even include the word moleskine or cahier at all. Even though cahier is French for notebook. So I’m screwed.

I hate ebay even more today than I did yesterday. But I’m between a rock and a hard place. Etsy is great and I’d love to do all my sales through it but I’ve always done the bulk of my sales through eBay. I’ve stuck with it through thick and thin but this may be where I draw the line. I’m carefully weighing my options, and I’ll come out with a plan soon. I wish this could have happened on a different week, I’m working crazy hours at my DayJob and I’m literally coming home to fall exhausted into bed, if I had more time I’d be able to deal with this in a more effective manner and get the listings back up on eBay the next day.

So those of you who are bidding, I’m sorry eBay stinks these days but expect that one last listing to come down tomorrow. I’ve contacted someone at eBay regarding my attempts to edit the title and being unable to do so, and I’m hoping that having made those attempts will get me some slack but I expect not.

(On a side note- I took a look at some of the other listings, and I’ve noticed that they do seem to be cracking down on this across the board. Knockoff bags, shoes etc are all getting taken down too, so I don’t feel so bad, but I’m expecting that for me to come into the radar that some one reported me.)

Sunday, September 02, 2007

ebay listings

After 2 weeks off I've got 6 auctions up on eBay right now, one set of coffee jotters, 2 sets of regular recycled jotters, 1 set of 100% recycled jotters, and 2 auctions for the custom jotters.

You can find them all here.

One Shots

So I was on YouTube watching som eThread Bangers episodes and I was thinking that those very same stencil design ideas could be applied to the covers of notebooks. I did a whoel art series a few years ago (okay so more like 9 years ago) of spray pained backgrounds, stencils and what not on paper, so I KNEW that the ideas in the threadbangers video would work on paper. SO I decided to take what I knew and apply it to a few covers of jotters and make a limited edition series of jotters. Here are the first few- I made 17 total, metallic spray paint, red and black and gray. I pulled a tribal wing flash design off the net and adapted it, a diagram of a heart and adapted that too, through painted up the back grounds, layers of paint, and gessoed covers, and finally embellishing with some snazzy stitching here are my results:


I decided to test the limits of my sewing machine too, I've added several extra pages- I went from 48 to 60! Yikes! I also went high end with the paper, some have 24lb 25% cotton and some have 100% cotton paper and some have hand stitchin. I'll have a few up on eBay later today and some on etsy too.

Wednesday, August 29, 2007

coffee jotter and finished order

Last night I finished the big order I wrote about in a previous post. I took the book into work with out taking a picture of each of them. So… I’ll snap a quick pic today when I get to work of the spines. Since I can’t show the covers without photoshop anyway, it doesn’t make too much of a difference. I will say the matching bindings in hemp are very cool. The excessive company branding is even cool when you look at how totally random it looks even if it isn’t.

After a week of being used and abused the coffee jotter is standing up VERY well to use. The mylar packaging is showing no signs of wear. The stick-on label is showing slight signs of wear but this is not a surprise. The label is a sticker meant to survive the abuses of a short sweet life on the retail shelf, not the travails of my jeans’ pockets.


written:8/17/07

I never did get a picture of the books but I did get them to the person purchasing them! He was really happy.

Tuesday, August 28, 2007

jotter cover ideas

Ideas for recycled jotter covers:

Advertising fliers in the mail- cardstock mailers

Covers from magazines

Paper shopping bags

Laminated plastic shopping bags

Old calendar pages

Old spiral bound notebook covers

Cardstock from the craft store

Advertising signs

Paint chips

Old magazine covers

Monday, August 27, 2007

The Finishing touches

To make your coffee bag jotter can be finished easily now that you've prepared and cleaned your bag. Start by lightly ironing the mylar, use a very light setting on you iron and cover the mylar with paper to protect your iron.

Too hot and you mylar bag will curl. Be careful.

I like to stitch down the flap with a zig zag stitch but you could use any decorative or straight stitch- or not stitch it at all.

Here you can see where I've stitched down the flap. Now you want to trim all the edges and make your piece of mylar square- it's easier to work with this way.


Flip the bag over and measure out the size of your notebook with a sharpie. I'm making a small pocket sized notebook here, so I've measured 5.5 inches down from the top. Trim the mylar to the right size.
Measure the size of your front cover plus 1/4 of an inch- so for my notebook I've measure 3.75 inches in and 'scored" a line with a pencil. Measure the same for your back cover and score again with you r pencil. Fold along the back cover score and fold any remaining mylar to create a flap.
After you've created your flap cut an angle to allow for creating a pocket.
After you've folded and cut your flap stitch the flap down again.
Stack the cover with 15 sheets of paper and use binder clips to hold it in place. You should just be able to see the score mark you made originally.


If you use a sewing machine stitch down that score mark using a wide straight stitch. If you don't have a sewing machine you can punch 15 holes and stitch through them to make your notebook.

Fold along the stitches press hard, use a bone folder to really crease the fold.


Hold the covers tight to the paper and gently hit the spine with a hammer, sharp hits but not pounding hits.
Line a ruler up witht eh back cover and trim away the excess uneven paper.


Here's the finished book. If you don't like how the cover sits, run your iron over it. If the mylar is too flimsy feeling you can raise the temp of the iron and laminate the cover to the first page.

Saturday, August 25, 2007

Prepare a Coffee bag for making a Jotter

Get one used mylar coffee bag.

Flatten it. Trim the bottom of the bag along the seam, just above it. You want as much usable mylar as possible to make your notebook.


After flattening and trimming find the air lock. On some bags it’s clearly visible and other’s it’s harder to find. I noticed that starbucks and Pete’s hide theirs in their logos. Keeping with the theme of keeping as much usable mylar as possible trim straight up from the bottom along one side of the airlock and them up the other side, you’ll be left with a strip of mylar about 1 inch wide with the airlock in it. Discard it.


Use a damp sponge wipe down the mylar. Then use a spray cleaner to continue to clean it. It may take several cleanings to get it clean. Don’t leave any of the coffee oils on the mylar as it will stain the paper when stitched in.

After this you can cut and stitch the mylar just like you would paper or fabric. I like to stitch down the seam along the back of the bag and then sew the jotter as if I was using cardstock.

Thursday, August 16, 2007

Give the Gift Of coffee Jotters- Congrats Peter!

One of my coworkers has been promoted; he’s headed off to work with a subsidiary of the company I work for as a traveling coffee guru. I’m unbelievably excited for him. The job entails a great deal of travel in the North East as well as out to Colorado where the subsidiary has its head quarters. How cool is that?

As a farewell and good luck gift to him I’m making him a set of Coffee Jotters made of the packaging of the company employing him. I’ve enlisted the help of several people working in his current department. When they brew coffee for sample they are saving the packaging for me. We’ll see how many packages I get from the weekend but I was able to snag one on Friday and I bought anew package of coffee and made that into a jotter.

These jotters are cool in that I added pockets to the front of each one. One I simply folded the packaging over and stitched it in place before I made the jotter and the other I trimmed the packaging to size and used a piece of the cuttings to make the other pocket. I think they came out really well.

I also did a little experimenting on the mylar. I remembered from high school art class that mylar will tack to itself at a fairly low temperature. One of the packages had a lot of seems that I didn’t want and were too small to trim off the package it would have fallen apart. So I hit it with the iron at a very low temperature, and while it didn’t tack down all the folds and creases in the mylar and plastic disappeared. I didn’t get the results I was looking for I certainly got results that were in the end quite useful. (Cautionary note: When I say low heat, I mean as LOW as my iron would go.) Oh so in the end I ended up simply zigzag stitching over the offending seams. I like the look.

So here are a few pictures of the Coffee Jotters.


I see now I forgot to remove a logo, but we'll all have to deal with it.

Tuesday, August 14, 2007

DayJob Sales

One of my coworkers is heading off on vacation, which is pretty typical this time of year what’s not typical is that he has seen some of my work and placed a custom order. He’s getting 5 large recycled journals, 8 matchbook notebooks and a set of jotters. Not to forget the notebook he’s getting for himself. One of the main requests was that I include as many company logos on them as possible, as they are going to his former coworkers. I was more than happy to do that for him. The results are some highly company branded books. I’m finished with almost all of them except for one, his. I’m hoping to get some shots of the finished work tonight and post some highly photoshopped pictures.

Also my DayJob boss bought a large 400-page journal for her best friend who was recently married. I don’t usually like to sell books at work, but I figured what the heck, it’s a one shot deal. It’s always cool to see the reaction of a person who first gets the journal. I never get to see that, because the journals almost always go off into the mail. I’ve gotten to see the reaction twice now. It’s one thing when I make them for someone but another when they purchase them from me- the reaction is similar but so very cool. Anyway, the big smile on my Bosses’ face made my day. I can only imagine how excited her friend is going to be when she sees the giant behemoth of a journal for the first time.

Wednesday, August 08, 2007

marketing this


Holy moley it’s freaking HOT here in Mass. I’ve been printing lines on paper and the paper and printed are not liking the humidity.

The printer keeps jamming because the paper keeps curling. So instead of hitting print and walking away par usual, I have to listen for the printer not printing and then come back, fix the darn thing and then go back to what I’m doing.

It’s mildly frustrating. Especially as I have a lot of paper to print- I’ve got a l;arge order lined up and I need to print it now, I’d rather wait but I can’t.

I’ve also worked on my marketing plan over the last few weeks. I’ve got a good outline of what I need to do now I’m just in process of picking out actual actionable items to add to it. I need a good plan to follow otherwise I won’t do much of anything. Essentially the plan involved 4 to 8 hours a week of additional work- over an above work on the website, making books, ebay and etsy. The goal is to get more people reading my blog and interested in my books. The plan utilizes what I already do plus some use of google analytics.

Have I written about how much I’m in love with google analytics? It’s freaking awesome. If you’re an artist trying to learn more about the visitors to your website, blog or other site you can use analytics pretty easily. There are a lot of screens to look at and see: where your customers/readers are coming from, how long they stay, what they look at, where they are from, among a large number of other things. You can also set up specific pages and entries to track. It’s highly customizable and the reports are really useful.

I’ve analyzed (yes I’m a total geek and this is what I partially do for my job) some of the reports to see where I can improve my links, referrals, and length of time spent on my site.

Anyway, I was pretty happy with how much time I spent on the plan today so I congratulated myself with a bottle of Magic Hat Hocus Pocus. I rarely drink these days but occasionally a nice ice cold beer is very nice.

Matcbook notebook redux!

It seems my little matchbook notebook re-design has led to some great interest! I'm pretty excited to say that my stuff is going to be featured on yet another blog!

You'll be able to read more about it here:
http://craftandfound.com/

Saturday, August 04, 2007

ebay and etsy sales

I’ve got 4 auctions ending Sunday. One each for the following items: PenSlip, Recycled Sign Cover notebook, Hedgehog with Graph Paper, and a hedgehog with cardstock pages.


I’ve got 3 items just listed, a set of 6 jotters, a set of graph paper jotters, and a set of recycled matchbook notebooks.

I’ve got some low buy-it-now prices and I’ve opened up my shipping to offer first class mail rather than just priority mail. I actually added this option after the USPS upped the price on their priority mail shipping but never announced it. I still believe that in most cases priority mail is the best way to go, especially if your ordering multiple items but I thought I’d give people a choice.

I”ll be loading some items up to etsy today as well. I’ve got a load of items on etsy- too many to list but you can see them all here.

Friday, August 03, 2007

Coffee Jotters

If you know me personally you know tht I love coffee. I love almost all forms of coffee but my favorite is fresh locally roasted coffee. There is really nothing like it. It’s a flavor sensation unlike any other coffee. Once you’ve had a really good fresh roasted coffee you can’t go back to folgers or other commercially available ground coffees.

My recent excursions into locally roasted coffee have led me to several new brands. One is not really a new brand it belongs to the coffee shop I walk to in my town called Atomic Coffee. The roast and brew their coffee on the premises and in the front room of their shop you can see the roaster. Coffee is fairly priced and damn good, plus they offer free WiFi.

Recently they have started to sell their coffee in limited amounts in some local stores. I saw a bag recently and had to buy it. Wonderful, even better at home than in the store. Truly awesome. If you are ever in Beverly Mass, I suggest you get over to Atomic and have some coffee and buy a bag to take home.

Then a recent excursion had me run into a brand called Karma Coffee. Silver foil bag and an elephant on the label. I was told by the guy selling it (Dan) that it’s a small roaster and coffee shop in Weston Mass. They roast in small batches and sell a lot of coffee. I was game so I bought myself a bag of Ethiopian Harrrar I can’t compare it to the stuff in the shop but if it’s half as good as the stuff I brewed at home that it’s got to be amazing stuff.

At this point you have got to be asking yourself what this has to do with bookbinding.

Patience!

I took one look at the bags and I wondered how I could make that into a book. Seriously I almost always think about how I can make something into a book. A coworker pointed out a sign- made of thick 1/8th inch plastic and asked if I could somehow make that into a book. I said of course I can.

So I cleaned the bag out- some spray cleaner really helped. (a quick I noticed item here- the locally roasted bags had far fewer oils on the inside of the bag than a non-local fresh roast bag that I also tried this with, and thus were far easier to clean.)

I then cut the vacuum valve off, and trimmed the bag to a useable piece. I then stitched it just like I would a regular jotter. I then trimmed it all down to the right size.

On a recycling note, most coffee bags are made of mylar and layered with plastic. They are not very recyclable. While I wasn’t able to re-use and upcycle ALL the bag I was able to get a lot of the bag into a new use. I’m pretty happy with it.

These are all mine, and not for sale.

An Ode to Jotter's and a slip case


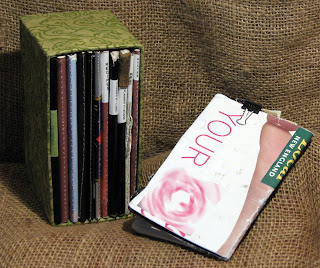
I’ve wanted to write a post about my favorite notebook of all time: the Jotter. I used the dimensions of the Moleskine Cahier and adapted it to work for me. I eschew the pocket in the back, use only 48 pages (depending on thickness), don’t perforate any pages and use whatever cover material strikes my fancy. They are easy to make either by hand or with a sewing machine. They are also super durable.
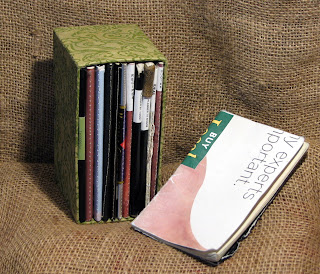
Where my other notebooks are pretty and contain a lot of my ideas my Jotters are my filter and my workhorse. Almost everything goes into these little beauties first, and then gets translated to my larger books. This is the spot my rough ideas for posts start, quick sketches for product ideas with brief descriptions, notes for work, grocery lists and yes, my to do lists.

They are a containment device, an idea capture, a funnel and a filter all in one. Because they are so easy for me to make I have no qualms about crossing out entire pages, filling up the pages with UPCs from work, or jotting down my hair brained schemes or funny quotes from friends. At this point everyone I know is accustomed to my whipping out my note book at a moments notice to take a note, jot down a phone number or copy down a to do list.

Theoretically they could be tossed out after I’m done with them but I can’t bear to part with them. There is so much RAW information contained within that I decided to keep them all. I used to have them in a rather untidy stack on the edge of my desk. (Who knows when I’m going to need to refer to mortgage information, or refer to my raw website plans to see if they translated well.) I knocked the stack over a few time and figured I could build myself something to store them all, so I did. I made myself a little decorative slipcase. Using binder’s board I built 4 sides and a base just tall enough to fit the jotters snuggly. It holds about a dozen, give or take what I’ve shoved inside. Now the notebooks sit on my shelf proudly, contained and within easy reach.
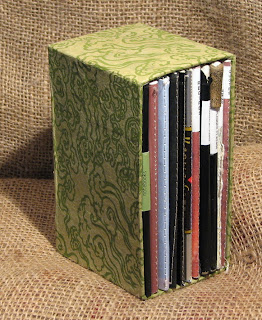
I’ve organized them oldest to the left and most recent to the right. I have 2 I refer to on a regular basis- the one for recipes and the one for quotes. When I finish a notebook I get out the label maker and apply to the thin spine a label of what is in it and it’s date range. I keep an assortment of new notebooks in the slipcase to keep everything square and looking neat. This way I can also pull out a new one whenever I need it.

As for the jotters, about a month into being stored and carried in my back hip pocket they get a little curved and a little beaten up. The paper along the spine gets a little worn but the sewing stays true. I’ve abused several of them, as have my friends and coworkers and man do they stay strong.

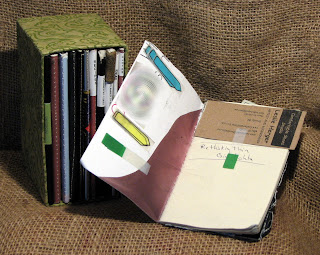
I set them up much the same way I used to set up my Volants- I apply a series of post it flags in the front, a small stack of post its and a mini 1/8 binder clip for anything that I might want to cart around but not glue into the pages. I carry an assortment of business cards (mine and others), coupons and little snippets in the back. I”ve given up on the PigPog style organization with my new job. I don’t need to have anything that structured, the new job is structured enough. But I DO organize it thusly: work info starts on the back page and goes forward, while all other information starts at the front. My current to do list and shopping list gets a little post it tab and the rest of the book is a catchall. Far more useful this way for my current position than the other styles I’ve tried in the past.
Wednesday, August 01, 2007

Matchbook Notebooks- Instruction

So here are some instructions for the matchbook notebooks. I used all recycled materials but you could use whatever you would like. I think they would look particularly attractive with some decorative papers that are available.

For my 2.5x3 inch pad of paper, I used a strip of cardstock that was 2.75 inches wide and 8 inches long. Depending on what you have around you could used longer paper and wider paper.

To start this notebook out. place your stack of paper right side to right side of the cover. Press in your staples. I used a 1/4 inch stack of paper and a heavy duty stapler and 2 staples, You could do this with one staple through the center.

IN the picture above you can clearly see the score marks that allow the cover to fold around and cover the staples. I scored about 1/2 inch up from the staples. I then folded on that score and wrapped the cover around to the back of the notebook.


As you wrap the cover around to the back press it into place. The pressure from your fingers will cause it to crease around the block of paper.

Now flip the stack over. You'll be looking at the right side of your paper and the inside of your cover, At the top part of your pad, score a line for the cover to fold up and around the block to make the cover. I then scored again 1/4 inch (the thickness of my pad) above that score. Fold the cover up and over your pad. You'll have a lot of overhang, I folded and glued my overhang to the cover.